
Make a Silver Convertible Brooch Pendant - FREE Course
Learn how to make a Silver Convertible Brooch Pendant in this FREE online course with Jewellers Academy
What is convertible jewellery?
Convertible jewellery, also known as modular or transformable jewellery, is designed so it can be worn in more than one way. In this project, you will learn how to make a brooch that can be also worn as a pendant.
This is a wonderful project that teaches you lots of techniques to expand your design possibilities.

Techniques covered in this course
- Designing a convertible piece of jewellery
- Transferring your design to the metal
- Piercing and filing your design
- Using metal stamps to create a textured finished
- Bezel setting a cabochon gemstone
- Soldering multiple joins
- Making a brooch pin and a brooch pin converter
- Adding a patina using platinol and polishing
And many more hints and tips
Included in the course: how to make brooch pin (left) and convertible pin/pendant (right)

This is a lovely project and there are so many design options for you to make the design your own.
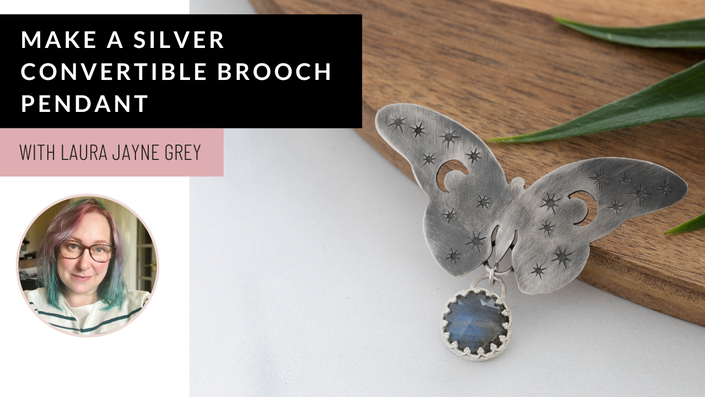
Here are the design examples that Laura shows in the course. She demonstrates how to make the butterfly.

Course Curriculum
-
StartCourse Notes, Tools and Materials List - PDF DOWNLOAD
-
Start1. Make a Silver Convertible Brooch Pendant - Course Samples and Materials, Piercing Your Design (16:00)
-
Start2. Make a Silver Convertible Brooch Pendant - Piercing and Texturing, Create a Bezel Setting (18:48)
-
Start3. Make a Silver Convertible Brooch Pendant - Creating a Gallery Wire Setting (16:12)
-
Start4. Make a Silver Convertible Brooch Pendant - Adding the Hinge Components (8:15)
-
Start5. Make a Silver Convertible Brooch Pendant - Forming the Brooch Pin (12:26)
-
Start6. Make a Silver Convertible Brooch Pendant - Creating the Adaptor, Setting the Gemstone, Patina part 1 (15:44)
-
Start7. Make a Silver Convertible Brooch Pendant - Adding Patina part 2, Polishing (10:16)
-
StartIf you enjoyed this course and want to learn more advanced jewellery techniques, check out our Diploma Program
-
StartYear 1: Diploma in Silver Jewellery - COURSE TRAILER (3:24)
-
StartYear 2: Diploma in Fine Jewellery - COURSE TRAILER (2:42)
-
StartYear 3: Advanced Jewellery Diploma - COURSE TRAILER (2:56)
Your Instructor

Laura-Jayne Grey is a mostly self-taught jeweller. Based in rural Shropshire, working mainly with recycled precious metals, Laura-Jayne keeps eco-friendliness at the heart of her work.
The use of textures and patina features heavily in Laura-Jayne’s jewellery, giving her pieces a whimsical folklore feeling. She has jewellery and commissions available from her business Small Dog Silver.
Who is this course suitable for?
This course is for intermediate to advanced-level jewellers with experience of working with silver, stone setting and soldering.
Tools and Materials
- Bench peg
- Jewellers saw and 2/0 blades
- Blade lubricant - blade butter/beeswax
- Drill - either hand drill or dremel/foredom
- 1mm drill bit
- Flat or half round file - cut 2
- Emery sticks/papers
- Needle file set
- Soldering station: torch and gas, soldering block, steel AA tweezers, liquid flux in a spray bottle or with a paintbrush, pickle solution. Hard and easy solder
- Sharpie
- Side cutters
- Round nosed pliers
- Parallel pliers
- Optional - label maker to print out design ideas (could use paper and double sided tape or draw free hand)
- Decorative stamps and brass mallet or texturing hammers
- If using steel wire for your pin, a pair of old side cutters or memory wire cutters
- Glass scratch brush
- Square pusher
- Platinol (or liver of sulphur)
- Refillable watercolour brush pen/water reservoir brush
- Green scotch brite mop
Materials
Note: these are the materials that Laura uses in the course so if you would like to recreate this piece this is what you need. We recommend you watch the course through and then use your knowledge to design your own piece and order the materials you need for that.
- 0.9mm sterling silver sheet - size dependent on your design
- Sterling silver tube - 1mm ID. 10cm
- 0.8mm round steel wire (may be listed as dental wire) 10cm. You can also use sterling silver wire but it would need to be Spring Hard or you’ll need to work harden it yourself
- 0.5mm sterling silver sheet - 5mm wide, 15mm long
- Rectangular runners x 3 (sold for christening bangles) or rectangular tube
- A finished chain
- Additional decoration - you could use different metals to create layers or incorporate gemstones.
- Laura adds a 10mm round cabochon
- Gallery wire or bezel strip
- 0.4mm sterling silver sheet - big enough for a back plate for your stone (you could also use up to 0.6mm)
Join our community of jewellery makers and get excellent training and support for your learning.