
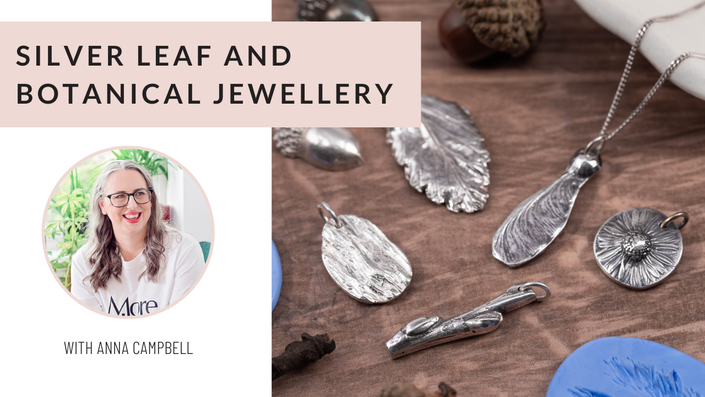
Silver Leaf and Botanical Jewellery
Learn how to make nature-inspired jewellery in this course packed full of techniques and ideas to inspire you.
Silver metal clay is a magical material that allows you to make solid silver jewellery without saws, hammers and heavy equipment. It is a perfect material for beginners as you don't need a lot of equipment to get started and it is easy to do from your kitchen table. No kiln is required!
As a material, silver metal clay is perfect for creating botanical-inspired jewellery because it can be moulded and shaped easily. It takes textures so well, even fine textures from leaves and petals.
Here are some examples of what you will learn to make in this course. Once you've mastered these your imagination will explode with new ideas!
The projects:
Project 1: Silver leaves

These silver leaves (left and middle) are unique because they are made by painting silver clay paste layers onto a real leaf. This is then fired to reveal the gorgeous detail, shape and veins of the leaf.
Project 2: Acorns

Project 3: Flowers

Learn how to make your own moulds using natural and botanical materials like acorns, shells, sycamore pods and so much more. You can then use this mould to make your own bespoke silver jewellery including pendants, earrings, charms and more
- Making a silver leaf making the paste painting method
- How to make your own silicone moulds
- How to use silicone moulds to make jewellery
- How to make a bail or drill a hole through to add findings
- How to torch fire your silver clay jewellery
- How to polish your jewellery
Techniques You'll Learn:
And much more
What's included?
You get 14 bite-sized videos. These are broken into sections to help you navigate and find the part you want to watch quickly.
Full course notes with step by step instructions
Lifetime access. Come back and watch whenever you want!
The videos
- Lesson 1: Introduction and Samples
- Lesson 2: Making Moulds for Metal Clay
- Lesson 3: Texturing Silver Metal Clay
- Lesson 4: Adding Layers to the Silver Leaf
- Lesson 5: Making Impressions from the Moulds
- Lesson 6: Preparing the Silver Leaf for Torch Firing
- Lesson 7: Making a Bail for Your Piece
- Lesson 8: Torch Firing the Silver Leaf
- Lesson 9: Drilling Holes and Polishing
- Lesson 10: Sanding, Filing and Refining
- Lesson 11: Attaching a Bail with Silver Metal Clay
- Lesson 12: Torch Firing part 1
- Lesson 13: Torch Firing part 2
- Lesson 14: Polishing and Finishing Your Pieces
Your Instructor
Anna Campbell is a metal clay artist and qualified teacher. She holds both the Art Clay and PMC Rio Rewards certifications as well as the higher diploma in metal clay from the Mid Cornwall School of Jewellery. She has been working with silver clay since discovering it in 2010. She has been a demonstrator of silver clay on Create and Craft TV and has had her metal clay featured on the cover of Making Jewellery magazine. Anna is one of the tutors on the Diploma in Silver Metal Clay with Jewellers Academy, having filmed a number of courses with us. She lives in Edinburgh and is the founder and lead tutor for Jewellery School Scotland.
Course Curriculum
-
StartCourse Notes, Tools and Materials List: PDF DOWNLOAD
-
StartLesson 1: Introduction and Samples (8:40)
-
StartLesson 2: Making Moulds for Metal Clay (19:20)
-
StartLesson 3: Texturing Silver Metal Clay (5:43)
-
StartLesson 4: Adding Layers to the Silver Leaf (2:26)
-
StartLesson 5: Making Impressions from the Moulds (15:37)
-
StartLesson 6: Preparing the Silver Leaf for Torch Firing (3:48)
-
StartLesson 7: Making a Bail for Your Piece (9:00)
-
StartLesson 8: Torch Firing the Silver Leaf (7:59)
-
StartLesson 9: Drilling Holes and Polishing (11:48)
-
StartLesson 10: Sanding, Filing and Refining (19:42)
-
StartLesson 11: Attaching a Bail with Silver Metal Clay (4:32)
-
StartLesson 12: Torch Firing part 2 (8:09)
-
StartLesson 13: Torch Firing part 3 (6:54)
-
StartLesson 14: Polishing and Finishing Your Pieces (9:13)

Tools & Materials
Essential Materials
- A selection of freshly picked leaves and other botanicals - twigs, acorns, flowers, bark etc
- 10g Art Clay Paste
- 7g Art Clay Silver
- Findings to finish off your pieces e.g. earring wires, jump rings, chain
- Work mat (can just be a laminated piece of card or any plastic bendy surface)
- Small paint brush
- Pin vice drill
- 1mm drill bit
- 3M polishing papers
- Metal polish and cloth
- Siligum Moulding Compound
- Acrylic block
- Acrylic roller
- Lightly textured texturing plate for the back of a piece
- Playing cards or acrylic spacers
- Selection of little cookie cutters including a selection of small circle ones
- Clingfilm
- Cocktail sticks
- Badger balm or olive oil
- Emery board or sanding sponges
- Scalpel
- Rubber clay tool
- Water in a spray bottle
- Polishing kit - pendant motor or barrel polisher
- Liver of sulphur e.g. XL gel
Essential Tools:
Tools and Materials for Firing:
- Jewellers hand torch (with gas)
- Firing brick
- Steel Tweezers
- Pyrex or metal bowl of water
- Timer (or watch/ phone stopwatch)
- Brass brush
Suppliers
Find a worldwide list of jewellery tools and materials suppliers here
Frequently asked questions
What is silver metal clay?
Silver metal clay is a manufactured material made up of just three things
- 100% recycled silver particles
- Plant-based organic binder
- Water
This makes the silver like a clay and it can be moulded, shaped and textured. Once dry, it can be fired with a jewellers torch to sinter into metal. During this process the organic binder in the clay burns away leaving the silver particles to sinter together to make a solid piece of metal. This resulting silver is of hallmark quality
Silver clay lends itself so well to the botanical projects in this course because it is so flexible and takes textures well.
Is this course suitable for beginners?
Yes, this course is designed for beginners with no experience of working with metal clay.
Do I need a kiln?
No you do not need a jewellers kiln for these projects, you can torch fire them with a jewellers torch or creme brule torch. If you do have a kiln, however, you are able to use it for firing these pieces.
What type of metal clay should I use?
In this course, Anna used Art Clay Silver. This is fine silver/999. You could use another brand of clay as the making techniques remain the same. For the firing instructions, do check the packet of the clay that you are using and follow these.
