
Make a Domed Locket - FREE course
Learn how to make a domed locket in this FREE online course with Jewellers Academy
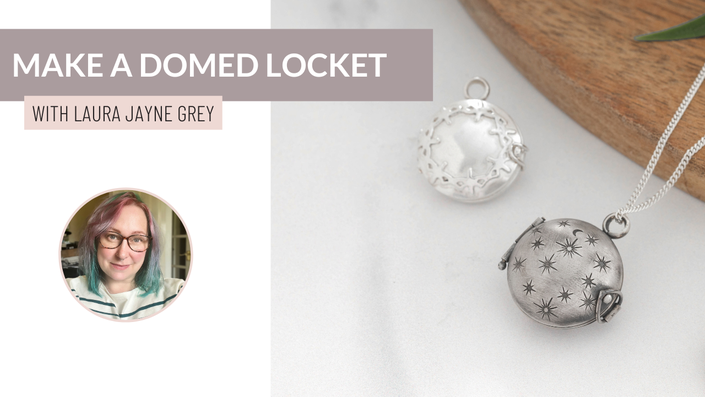
In this course, you will learn how to create two different styles of domed locket
- A hinged locket with a clasp
- A riveted locket
This is a wonderful project that teaches you lots of techniques to expand your design possibilities.

Techniques covered in this course
- Doming metal to make a locket
- Making and soldering a hinge
- Creating a retention circle (for popping a photo or keepsake in)
- Making a locket clasp
- Creating a bail
- Riveting
And many more hints and tips
Project 1: Hinged Locket with a Clasp

These locket designs open and close using the hinge or rivet. You will learn how to add a retention circle for keeping a photograph or other keepsake inside.

This is a lovely project and there are so many design options for you to make the locket your own.
I can't wait to see what you make!
Course Curriculum
-
Start1. Intro and Cutting & Doming the Discs (19:20)
-
Start2. Soldering the Retention Disc to the Dome (16:24)
-
Start3. Creating the Hinge (19:56)
-
Start4. Setting Up for Soldering (16:50)
-
Start5. Soldering the Hinge (21:05)
-
Start6. Finishing the Hinge (16:33)
-
Start7. Project Two: Swing Hinge Locket (Part 1) (20:34)
-
Start8. Project Two: Swing Hinge Locket (Part 2) (18:50)
-
StartCourse notes, tools and materials list: PDF DOWNLOAD
-
StartIf you enjoyed this course and want to learn more advanced jewellery techniques, check out our Diploma Program
-
StartYear 1: Diploma in Silver Jewellery - COURSE TRAILER (3:24)
-
StartYear 2: Diploma in Fine Jewellery - COURSE TRAILER (2:42)
-
StartYear 3: Advanced Jewellery Diploma - COURSE TRAILER (2:56)
Your Instructor

Laura-Jayne Grey is a mostly self-taught jeweller. Based in rural Shropshire, working mainly with recycled precious metals, Laura-Jayne keeps eco-friendliness at the heart of her work.
The use of textures and patina features heavily in Laura-Jayne’s jewellery, giving her pieces a whimsical folklore feeling. She has jewellery and commissions available from her business Small Dog Silver.
Who is this course suitable for?
This course is for intermediate to advanced-level jewellers with experience of working with silver and soldering.
Tools and Materials
Tools for both projects (hinged and riveted lockets)
- Disc cutter and centre finders OR dividers/circle template
- Brass hammer
- Burr life lubricant or beeswax
- Doming block and punches
- Steel block
- Sandpaper - 180 grit
- Soldering set up - soldering/charcoal block, spray or liquid flux, scrap copper, torch, tweezers, pickle
- Jewellers saw and saw blades - 2/0
- Bench peg
- Flat file - cut 2
- Buff sticks or emery papers in various grades
- Masking tape
- Round needle file
- Sharpie
- Callipers
- Binding wire
- Parallel pliers
- Flush cutters
- Round-nosed pliers (ideally parallel pliers)
- Riveting hammer
- Polishing kit - emery papers or pendant motor with attachments
- Optional - any texturing hammers or design stamps to decorate.
- Optional - oxidising solution such as Platinol or liver of sulphur
- Optional - Laura used a watercolour brush pen (with a reservoir)
- Optional - Green scotchbrite mop
Tools for riveted locket
As above plus:
- 0.6mm ball burr
- 0.9mm drill bit
- 1.2mm drill bit
- 1.5-6mm drill bit (to match the outer diameter of your tube)
- lubricant for drill bits (burr life, 3-in-1 oil)
- Pendant motor/dremel plus eye protection
- Template for a bail - Laura uses one from CoolTools or you could draw one.
- Bail-forming pliers or a round tool that isn’t tapered (doming punch, knitting needle or pen)
- Scribe
Materials
Hinged locket
- 0.9mm sterling silver sheet, 30mm x 60mm
- 0.4mm sterling silver sheet, 30mm x 60mm
- 1mm ID, 1.6mm OD sterling silver tube, 40mm
- 0.8mm sterling silver round wire, 60mm
- D wire (2.3mm x 1.5mm) for a jump ring, 30mm
- A small amount of scrap silver for a granule
- Hard and easy silver solder
- Any additional embellishments for your design
Riveted locket
- 0.9mm sterling silver sheet, 30mm x 60mm
- 0.4mm sterling silver sheet, 30mm x 60mm
- 0.4mm sterling silver sheet for bail, 10mm x 60mm
- 1mm ID, 1.6mm OD sterling silver tube, 30mm
- Hard and easy silver solder
- Any additional embellishments for your design
Join our community of jewellery makers and get excellent training and support for your learning.